DVI – Employee Bio’s to Include in the Inspection
When we text our customers a digital vehicle inspection, we include a photo of the employee and a quick write-up on their history, specialties, etc. You can add this function to your Tech’s and Advisors and have it included in every inspection. For a sample, see this sample inspection.
First, let’s prepare your employee photo for uploading:

Once you have your photo ready, select Settings > Shop Users at the top of your screen, then click the “Edit” button to the right of your employee. Once you’ve opened the employee’s info, select the “Biography” tab:
The form looks like this:
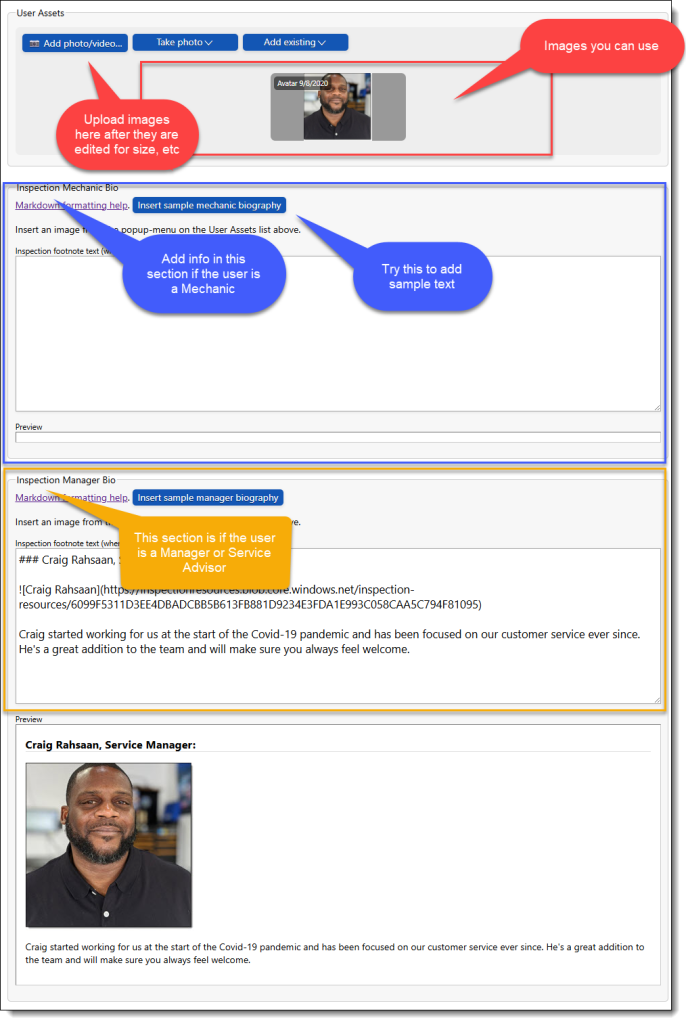
The user assets at the top are where you add/store images for your employee. Then the form is broken into two sections, they are either a Mechanic or an Manager/Advisor. If you want their information to appear as a Manager, enter it in the Manager section. The same goes for a Tech. If you have someone who does both, you can duplicate the info in both text boxes.
You should start by adding the sample text. Notice the formatting, and how it looks in the preview section.
The language used in the box is called “Markdown”. Click the Markdown formatting is supported link to see all of the options.
The sample I’m showing is pretty simple:
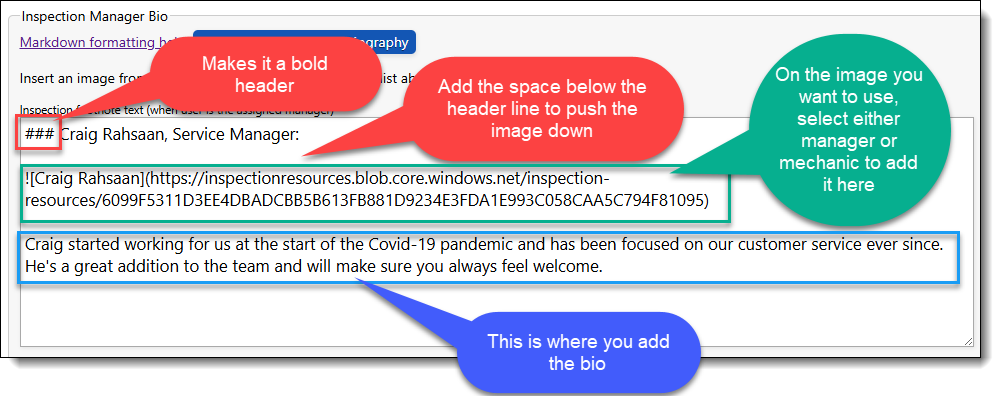
### Craig Rahsaan, Service Manager:

Craig started working for us at the start of the Covid-19 pandemic and has been focused on our customer service ever since. He’s a great addition to the team and will make sure you always feel welcome.
Line 1 starts with the “###“, which will make this line in BOLD TYPE
Line 2 starts with “!“, which tells it that we’re adding an image here. The words between the “[ ]” brackets are placeholders that appear if the image does not load. Then a link to the image. You can add images to a user’s asset list and copy the URL from there. For best results, an image of around 200 pixels wide works best.
Line 3 is his Biography. Keep it simple, the customer doesn’t need (nor probably care) what kind of parrot he has or what his favorite color is…
Make sure to add the blank lines as you see above so the image is placed above the bio instead of on the same line.
The inspection will now show something like this every time he is selected as the Manager on an inspection:

You can make images taller than the 200 pixels and use that area to add digital certificates, awards, etc: