
DVI – Working With Tasks
Once you have used the system for a few days or tried the included templates, you may decide that you’d like to customize the tasks a bit. This is a comprehensive guide to helping you understand how the system is put together and what changes can be made.
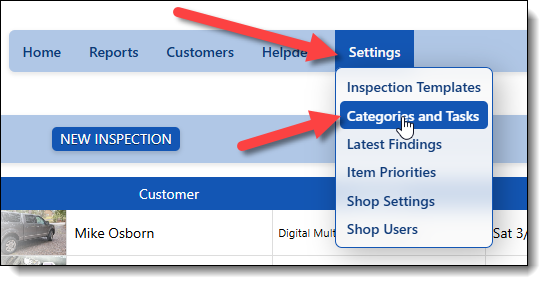
To access your tasks, go to the settings menu and select “Categories and Tasks.” If you don’t see this option, you may need to get the Shop Owner to upgrade your security settings.
Remember that all tasks belong to a specific category. When you see the list of categories, simply click a row to expand it and show all of the tasks within that category.
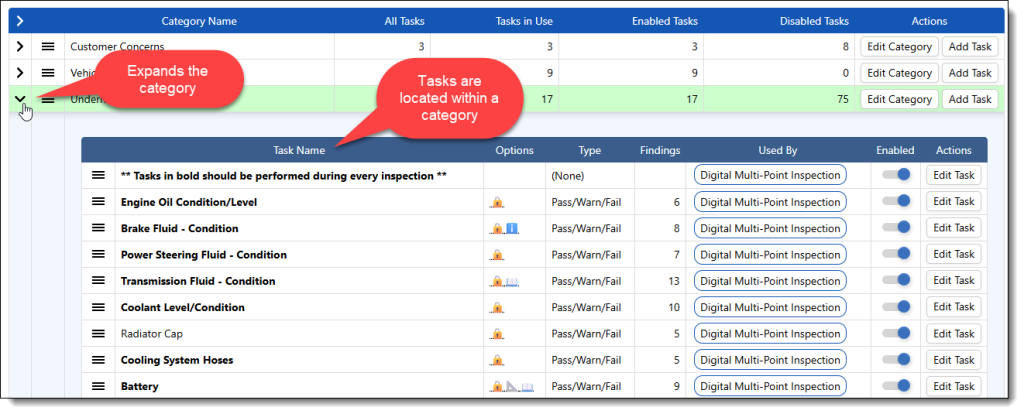
![]() Notice the familiar 3 bars to the left of each task, which allows you to sort them in any order. This order will be reflected in any template that includes the tasks. The next column is the task name, or what we’re asking the mechanic to check. This can also be used as instructions, like the first row shown above, to tell them something about the list of tasks.
Notice the familiar 3 bars to the left of each task, which allows you to sort them in any order. This order will be reflected in any template that includes the tasks. The next column is the task name, or what we’re asking the mechanic to check. This can also be used as instructions, like the first row shown above, to tell them something about the list of tasks.
The next column with icons can contain these:
🔒Indicates that the task is locked, and a mechanic cannot add new findings
ℹ️ Indicates that this task has a paragraph that explains the task to the customer
📖 Indicates that the task includes instructions for the mechanic to follow
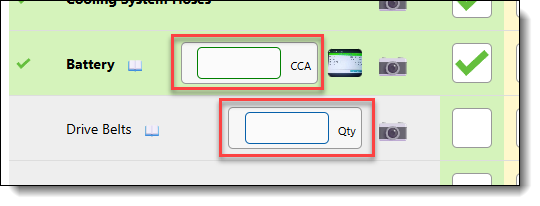
📐 Indicates there is a spot for the mechanic to add measurements (Miles, inches, etc.)![]() Indicates that this task is for internal use only and will not be visible to your customers.
Indicates that this task is for internal use only and will not be visible to your customers.
The “Type Column shows you what type of task this is. There are many. The most common is “Pass/Warning/Fail”, which uses the green/yellow/red options that you’re used to. Another type we use commonly is the “Yes/No” type, which turns the task into something that can be answered with a yes or no answer. You might use that to ask the mechanic if they test-drove the car.
The Findings column shows you how many options are available in a dropdown when a mechanic marks a task as yellow, red, or no in a yes/no question. It is optimal to keep this less than 10 to keep things simple and easy to read. When the list grows too large, it takes too long to make a selection
The next column shows you which templates the task is used in. It can be used in any of them.
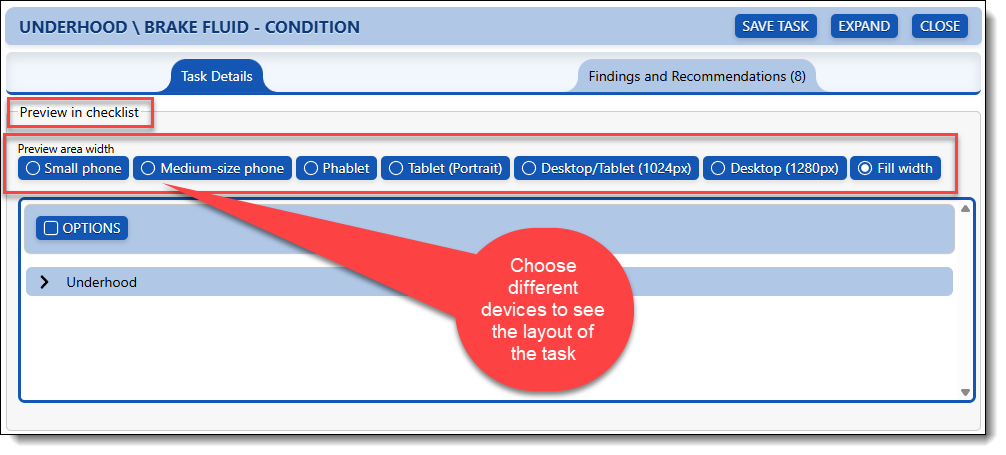
Finally, the option to edit a task. That opens up this window, and I’ll go through all of the options:
At the top of the screen, you see a sample of what this task will look like on different devices
Under the task details section, you have these options:
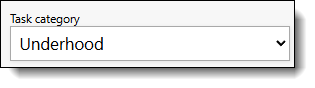
This shows you the category the task is attached to and will allow you to move a task to a different category
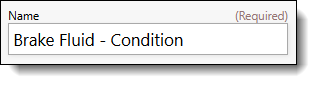
The name of the task, edit as needed
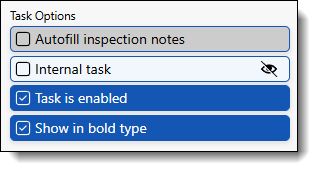
- The Autofill inspection notes option allows a task to be automatically filled in from shop management systems like ROWriter, Protractor, and TekMetic, and will bring in the customer concerns
- The Internal Task option means that this task will not be visible to the customer. Use this for questions like “Is it 4 Wheel Drive?”
- This can be used to turn a task off so it cannot be used in a template.
- If you want to make this task appear in BOLD type, it can be used to inform a mechanic that it is important and should be included in every inspection. There’s also the option to show only bold items to a mechanic, in case you have a lube tech who only wants to see a small number of items on a simplified checklist.
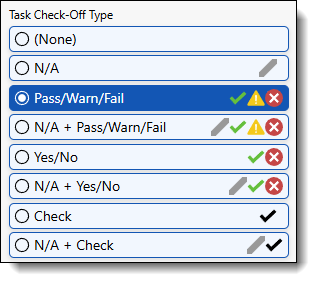
These options let you choose what type of task you want. You have options to make it a statement-only without checkoff options, to show something that is non-applicable, to use yes/no options, or any combination. If you’re unsure of what it will look like, just look at the live sample above the selections.
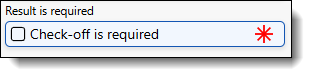
This is used to make a task mandatory. The mechanic will not be able to complete the inspection without bypassing a warning that lets them know they missed something
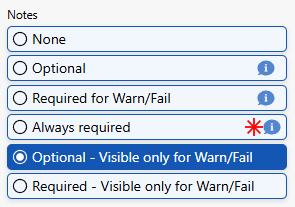
The notes option determines whether you will allow the mechanic to add their own notes to a task. It can also make notes mandatory. We recommend the “Optional – Visible only for Warn/Fail” option, as you don’t want the mechanic to be able to add notes unless there’s a problem.
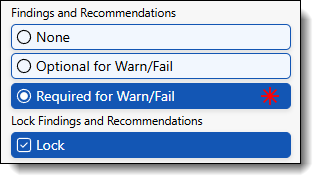
Findings and recommendations let you decide whether this task will be preloaded with a list of options to select when a task is marked as a warning or a failure. This is where you can choose to lock a task to prevent users from adding new findings to the existing dropdown options
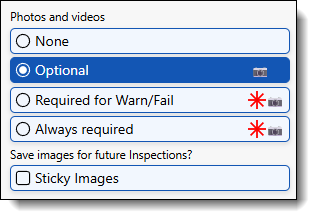
Photos and videos can be added to any task. We have no limit on the number of photos and videos; up to 200 MB can be added. Most other systems limit you to 10 MB, which can be very restrictive. The other option here is whether you want the image to be “Sticky“. This means that an image taken during this specific task will be automatically saved to this task and vehicle, and will automatically appear the next time a checklist is created for this vehicle. This is handy when you’re asking for static images, such as a tire placard or VIN plate.
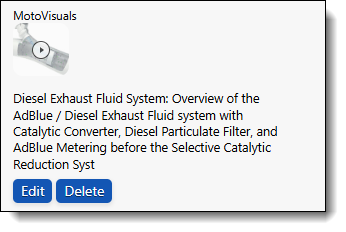
We can add a MotoVisuals account to your software. If you already have an account with them, we can use that, or you can purchase a subscription through us for less. This is where you would set up a task to include an explainer video from that account. If you would like us to turn that feature on, please reach out to discuss it.
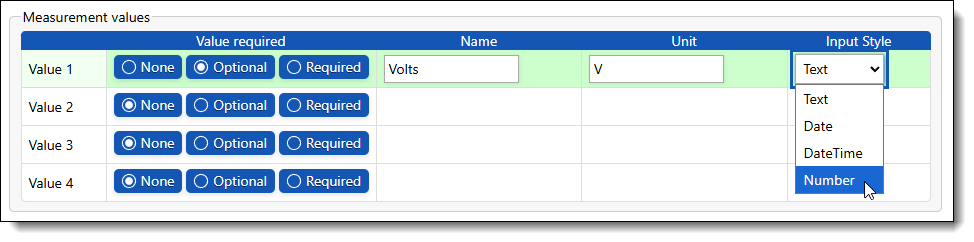
Measurement values include a form for your mechanics to enter details such as tread depth, tire PSI, battery voltage, etc. You can have up to 4 per task. They can be optional or required. Give the option a name like “Volts”, set the measurement value you want to use, and then decide what style you want it. You can leave the name blank if it is self-explanatory, like the battery one shown above
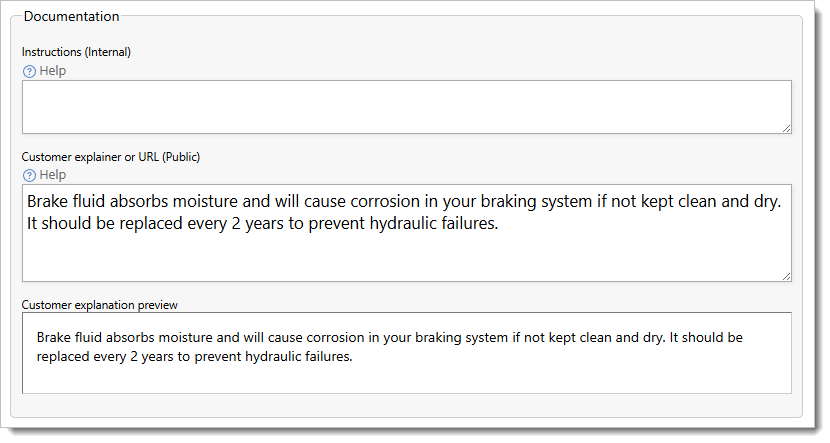
The last section is where you can add an internal note for the mechanic to see when they are working on the checklist, or a customer-facing explanation to help them understand the task better.
The next article will focus on the Findings and Recommendations